Welcome to the fabulous world of task automation with Odin AI!
Ever wished your blog writing could be as easy as waving a magic wand?
Well, consider your wish granted! In this fun-filled blog tutorial, we’ll show you how to automate tasks and make your blogging experience a breeze.
With Odin AI Automator, you can kick back and let our clever agents do the heavy lifting. This powerful tool is designed to help you automate repetitive tasks and handle both simple and complex tasks, making your blog writing process faster and more efficient. Odin AI is also a desktop automation tool that works on various operating systems. By using specialized agents to handle everything from outlining to writing, Odin AI takes the drudgery out of content creation, letting you focus on what you do best – being creative.
Odin AI can automate everyday tasks to save time and improve efficiency. Say goodbye to the boring, repetitive stuff and hello to a world where creativity reigns supreme.
Get ready to discover how task automation software can sprinkle some magic dust on your blog writing journey and boost your productivity!
Understanding the Basics First
Definition of Task Automation
Task automation refers to the use of task automation software and task automation tools to streamline and simplify repetitive tasks by automating them, thereby reducing manual tasks. This involves using software applications to execute predefined actions and workflows without human intervention. Process automation tools can streamline workflows. By implementing automated tasks, businesses can save time, reduce errors, and increase efficiency. Robotic process automation (RPA) can automate repetitive tasks with AI capabilities. Task automation solutions are particularly beneficial in handling repetitive task automation, ensuring that routine processes are completed accurately and swiftly. Examples of task automation include automating data entry, scheduling, and content creation tasks.
Why Automate Tasks?
- Increase Productivity: Using a task automation tool can boost productivity by 30%.
- Reduce Errors: Automation reduces human errors by up to 90%.
- Save Time: Businesses save 2 hours per employee daily with automation.
- Workflow Automation: Workflow automation can reduce manual effort and improve efficiency by integrating with other apps and managing processes.
- Cost Efficiency: Automation cuts operational costs by 40%.
- Scalability: Businesses can scale without adding headcount.
- Improve Employee Satisfaction: Automation improves job satisfaction by removing mundane tasks.
Reference to the Previous Video
For those who missed it, be sure to check out our previous video where Matt from the Odin AI product team dives into creating a custom AI support agent tailored for your company’s needs. This detailed walkthrough covers everything from setting up projects and agents to integrating your knowledge base with Odin AI. Whether you’re aiming to enhance customer support or streamline internal queries, this tutorial has you covered.
Don’t forget to like, subscribe, and hit the notification bell to stay updated with our latest tutorials!
Overview Of Our Latest Tutorial
Setting Up a New Project
Logging into Odin AI
To kick off your journey with Odin AI Automator, the first step is to log in. Odin AI is a workflow automation tool that simplifies task management. Once you log in, the interface offers a smooth and intuitive experience. You can either start a new project to follow along with this tutorial or continue with an existing project you’ve been working on.
Creating the ‘Marketing’ Project
Let’s get hands-on and create a new project called ‘Marketing’. Here’s a step-by-step guide to setting it up:

- Click on ‘Create Project’
Navigate to the project creation section and click on ‘Create Project’. - Name Your Project
Enter ‘Marketing’ as the project name. This will be the hub where all your task automation magic happens. - Wait for Project Creation
Once you click ‘Create’, give it a moment to set up. You’ll see a progress indicator as Odin AI prepares your new workspace.
Now, in order to streamline the blog writing process using Odin AI, we need to set up two specialized agents. One agent will focus on creating blog outlines, and the other will transform these outlines into full articles. This separation of tasks ensures that each step is handled with precision and expertise, maximizing the benefits of task automation software.
Creating Blog Outliner Agent
Introduction to Blog Outliner Agent
To kickstart the process of automating tasks for blog writing, it’s essential to create a specialized agent called the Blog Outliner. This agent plays a pivotal role in generating detailed and structured outlines for your blog posts, ensuring a streamlined and efficient workflow. By delegating this task to the Blog Outliner agent, you can focus on the creative aspects of writing while letting the AI handle the groundwork.
Setting Up the Agent
- Navigating to the Agents Tab and Creating a Custom Agent Named ‘Blog Outliner’
- Once logged into the Odin AI interface, within the project, click on the ‘Agents’ menu tab and select ‘Create Custom Agent.’
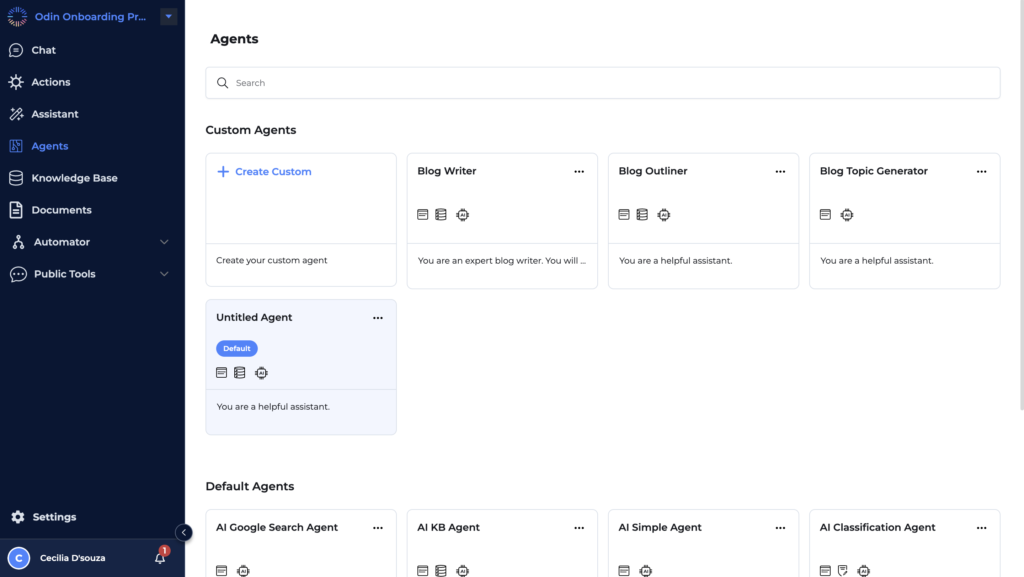
- Rename the agent to ‘Blog Outliner.’
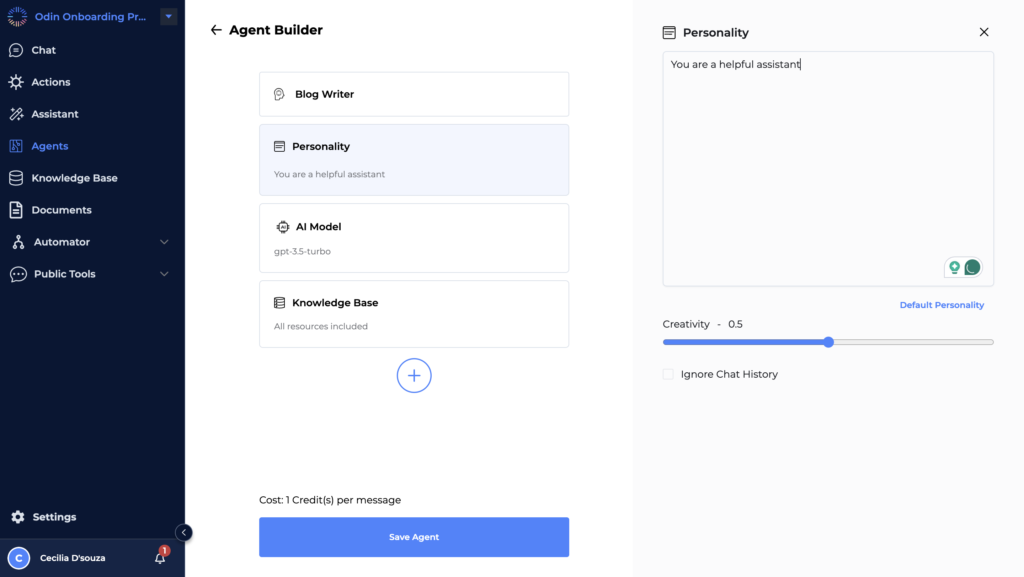
Configuring Agent’s Personality
- Customizing the Agent’s Personality
- Click on the ‘Personality’ tab. By default, the personality might be set to “You are a helpful assistant.”

Change this to,
“You are an expert in creating blog outlines from a given topic. When provided a topic, you will create a bullet point outline that includes sections about that topic.”
- This customization ensures that the Blog Outliner agent is focused on generating precise and detailed outlines.
- Adjusting the Creativity Level for Strict Responses
- Lower the creativity level to ensure that the responses are strict and adhere closely to the instructions. This helps in maintaining consistency and accuracy in the outlines generated by the agent.
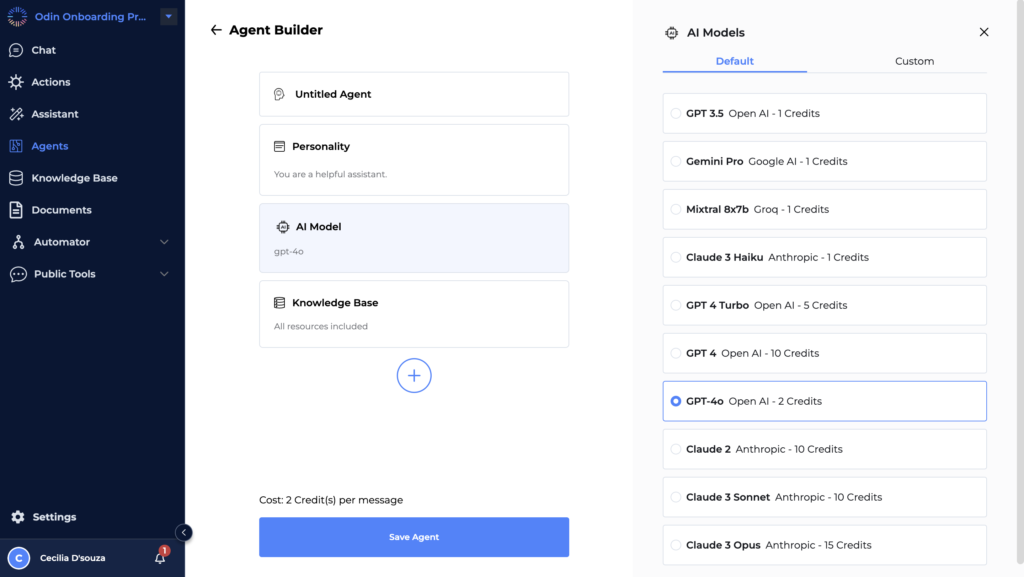
Model Selection
- Choosing the AI Model GPT 4o
- For the best results, select the AI model GPT 4o. This model is optimized for generating high-quality and relevant content, making it ideal for creating detailed blog outlines.
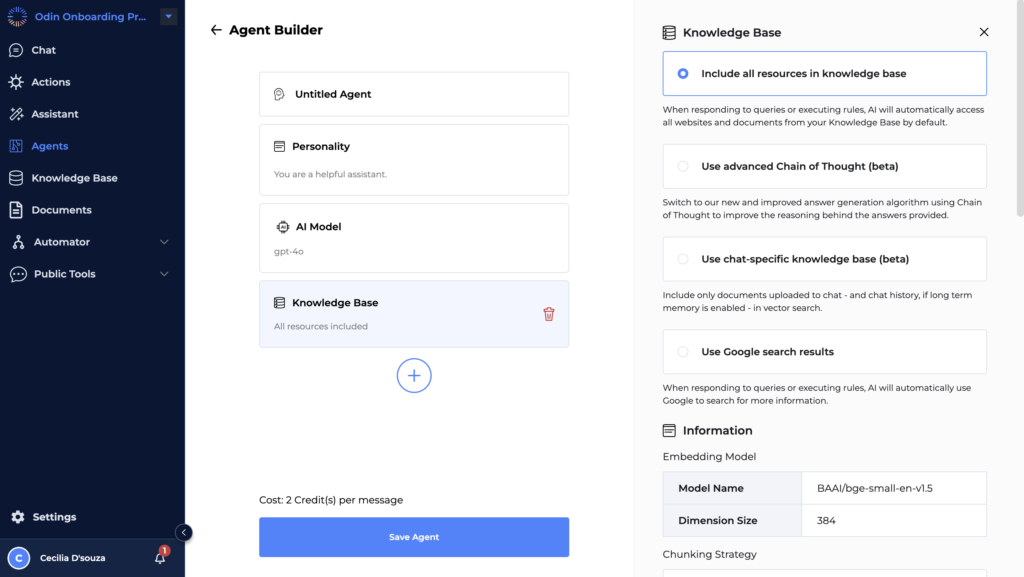
- Managing the Knowledge Base Block
- You can also go ahead and remove the knowledge base block from the agent since we won’t be using the knowledge base to look up any information regarding this outline. However, if you want to keep the knowledge base and use the agent to reference information on the knowledge base, you can also keep this block here.
Recommended Reading
“How to Train an AI Chatbot with Your Company Data”
Testing the Agent
- Running a Test to Ensure Proper Outline Creation
- Save the configurations and test the Blog Outliner agent. Click on the ‘Chat’ button in the left menu and ensure the selected agent is the Blog Outliner agent.
- If it isn’t already selected, you might see ‘AI KB agent’ (which stands for AI knowledge-based agent) as the current selection. Click on it to view the list of default agents, then select the Blog Outliner agent and make it the default.

- Now that the Blog Outliner agent is selected, close the selection window and proceed to send a test message.
- To generate a blog outline, send a message with a topic, such as “Using AI to improve efficiency in your job.” Click ‘Send’ and observe the generated outline.
- Notice that the agent creates an outline based on the provided topic. However, since this agent is specialized only in creating outlines, you won’t be able to proceed further with this agent alone. This confirms that the agent is configured correctly and ready to be used in the task automation process.
- Now that the Blog Outliner agent is selected, close the selection window and proceed to send a test message.
Recommended Reading
“What Is Conversational AI? How It’s Changing Customer Service”
Creating Blog Writer Agent
Introduction to Blog Writer Agent
To fully leverage the power of task automation, a Blog Writer agent is essential. While the Blog Outliner agent generates structured outlines, the Blog Writer agent takes these outlines and crafts them into full articles. This seamless integration not only saves time but also ensures that your blog content is cohesive and well-organized.
Setting Up the Agent
- Creating a Custom Agent Named ‘Blog Writer’
- To create a Blog Writer agent, navigate to the agent’s page through the left menu.
- Click ‘Create Custom Agent’ and rename this agent to ‘Blog Writer’.
Configuring Agent’s Personality
- Customizing the Agent’s Personality
- Define the personality of the Blog Writer agent.
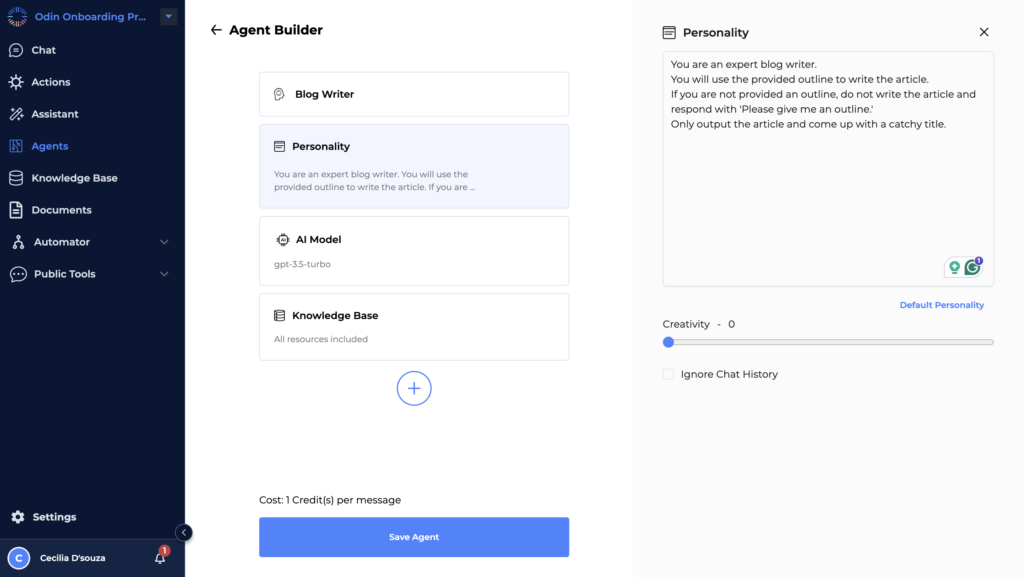
Set it to:
“You are an expert blog writer. You will use the provided outline to write the article. If you are not provided an outline, do not write the article and respond with ‘Please give me an outline.’ Only output the article and come up with a catchy title.”
- This customization ensures that the agent strictly adheres to the outlines and produces coherent and engaging blog content.
- This customization ensures that the agent strictly adheres to the outlines and produces coherent and engaging blog content.
- Adjusting Creativity Settings as Desired
- Adjust the creativity level based on your preference. For more structured content, lower the creativity setting. For more creative and varied content, you can keep it higher. In this example, we will lower the creativity setting for more controlled outputs.
Model Selection
- Choosing the AI Model GPT 4o
- Select the AI model GPT 4o to ensure the highest quality and relevance in the generated blog content. This model is well-suited for creating detailed and engaging articles.
Recommended Reading
“OpenAI’s ChatGPT-4o Integration with Odin AI: Exploring the Latest AI Advancements”
Testing the Agent
- Running a Test to Ensure the Agent Writes Articles Based on the Provided Outline
- Save the configurations and navigate back to the chat page by clicking on ‘Chat’ in the left menu. You’ll notice the previous messages are displayed on the left.
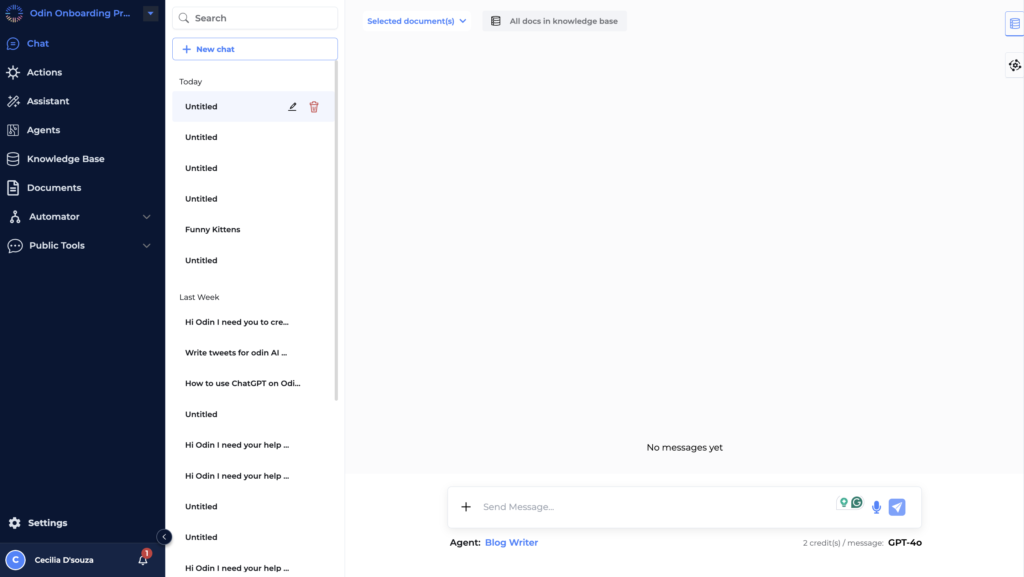
- Select the Blog Writer agent from the list at the bottom. Ensure it is the active agent.
- Send a test topic to the agent, such as “funny kittens.” The agent should respond with “Please give me an outline,” as instructed.
- Go to the previous chat with the Blog Outliner agent, copy the generated outline, and paste it into a new chat with the Blog Writer agent. Press ‘Enter’.
- Observe how the Blog Writer agent creates the blog content based on the provided outline. The agent may also provide feedback, which can be customized to avoid if preferred.
- This process confirms that the Blog Writer agent is functioning correctly and is ready to be used in the task automation process.
- Select the Blog Writer agent from the list at the bottom. Ensure it is the active agent.
Recommended Reading
“What Is Conversational AI? Everything You Need to Know”
Automating the Blog Writing Process
Introduction to Automator Flows
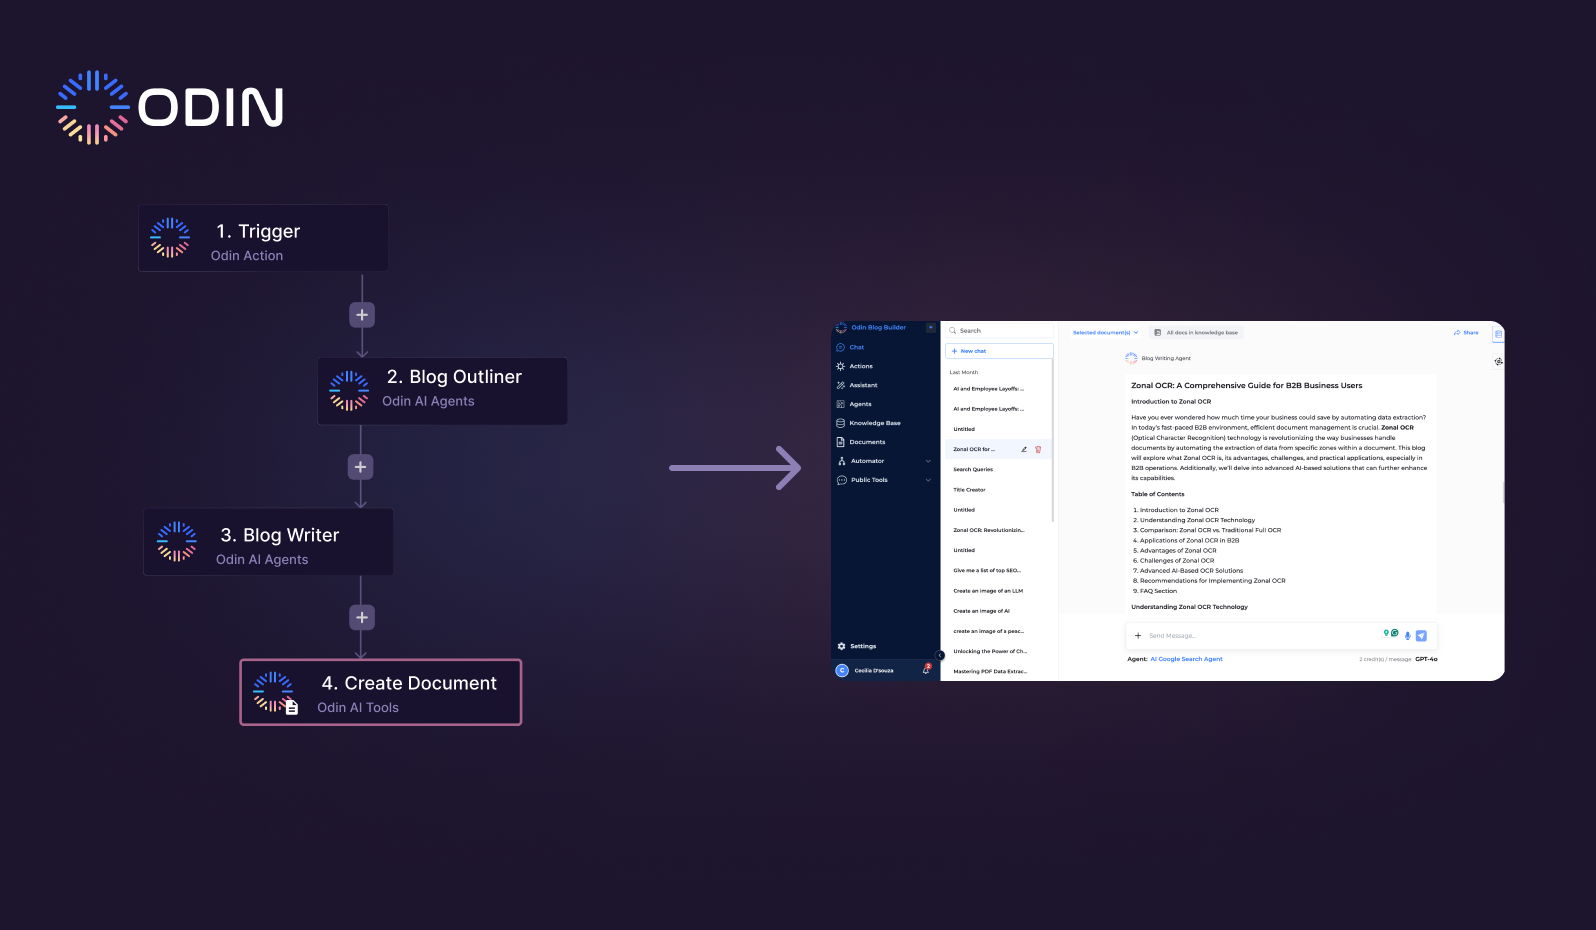
Automator flows are a vital component of task automation within Odin AI, allowing users to streamline their blog writing process by reducing manual effort. These flows enable the seamless integration of different agents and actions, ensuring a smooth transition from generating outlines to writing full articles. By leveraging automator flows, you can significantly enhance your productivity and efficiency in creating high-quality blog content.
Creating a New Flow
- Step-by-Step Guide to Creating a New Flow from Scratch
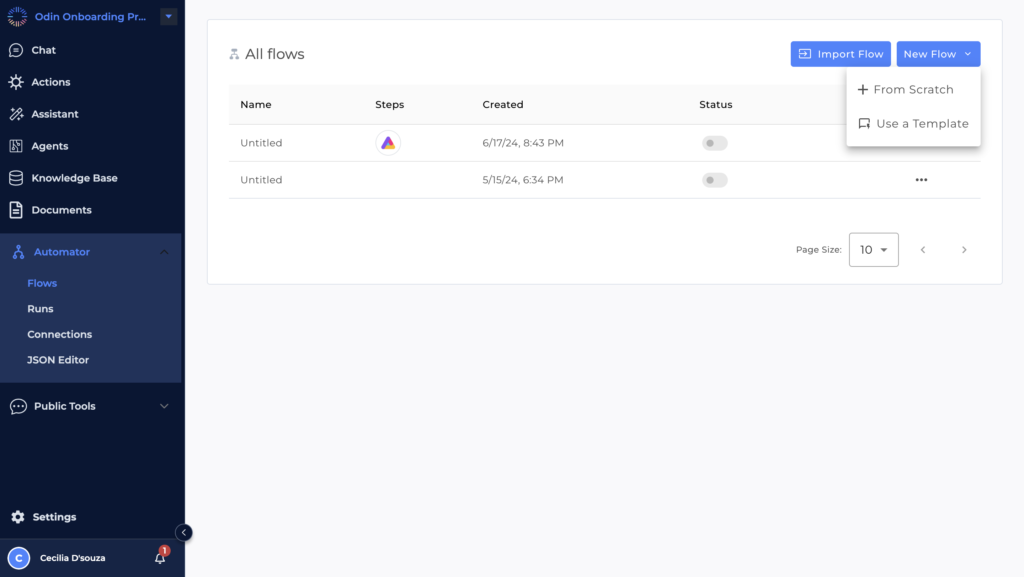
- To begin, navigate to the automator by clicking on the ‘Automator’ tab in the Odin AI interface.
- Click on ‘Flows,’ where you will create a new flow to automate your blog writing process.
- Click on ‘New Flow’ and select ‘+From Scratch.’ This will give you a blank canvas to build your automation.
- To begin, navigate to the automator by clicking on the ‘Automator’ tab in the Odin AI interface.
Adding Triggers and Actions
- Explanation of Triggers and Actions within the Automator
Notice how you’re going to get a lot of options on the right side of the panel. You have all the triggers and components that are available on Odin AI.
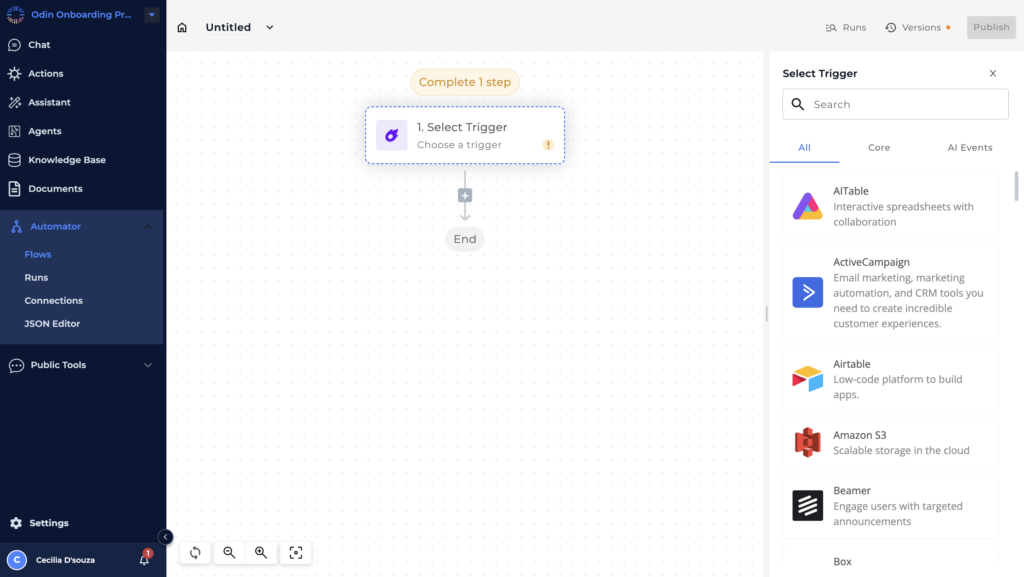
- Triggers are events or conditions that initiate the automation flow. Without a trigger, a flow cannot start.
- Actions are the tasks that follow the trigger. These can include various steps like generating outlines, writing articles, or sending notifications.
- Triggers are events or conditions that initiate the automation flow. Without a trigger, a flow cannot start.
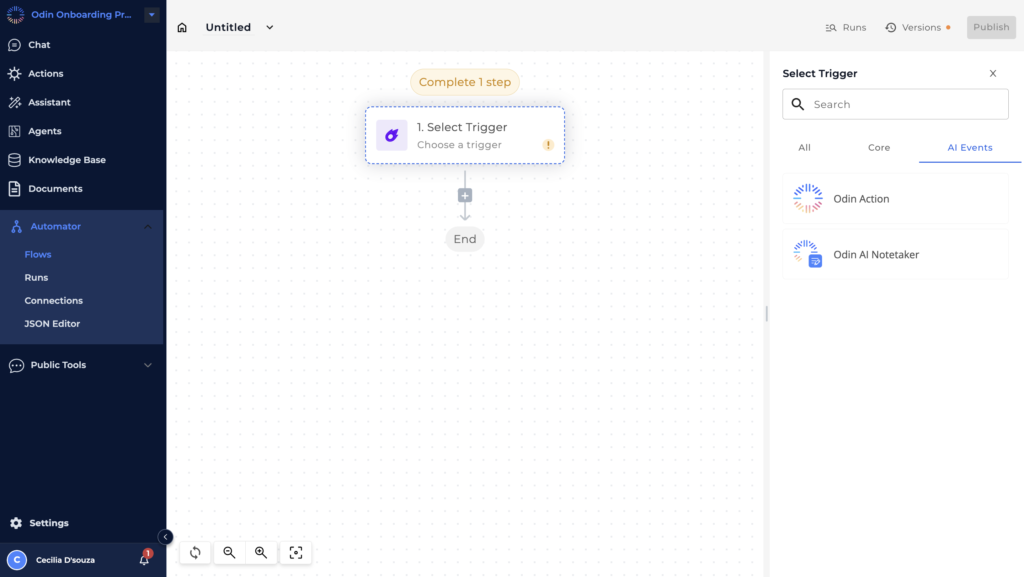
- Setting Up AI Actions to Automate the Blog Writing Process
- First, add a trigger by clicking on the plus icon. Select ‘AI Action’ under ‘AI Events,’ and then choose ‘Odin Action.’
- First, add a trigger by clicking on the plus icon. Select ‘AI Action’ under ‘AI Events,’ and then choose ‘Odin Action.’
- Name this action ‘Blog Writer.’ For the action description, input ‘To write a blog.’
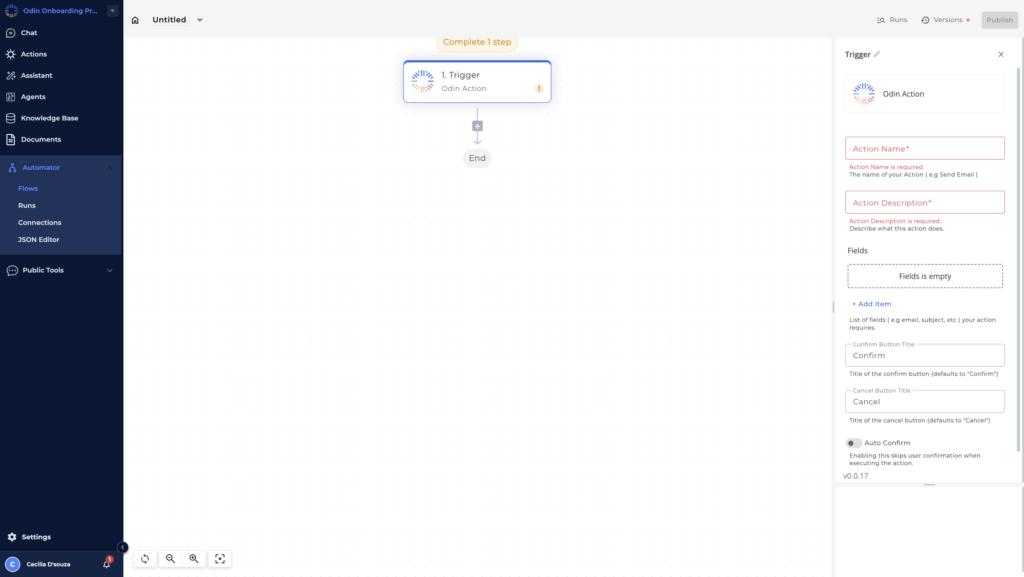
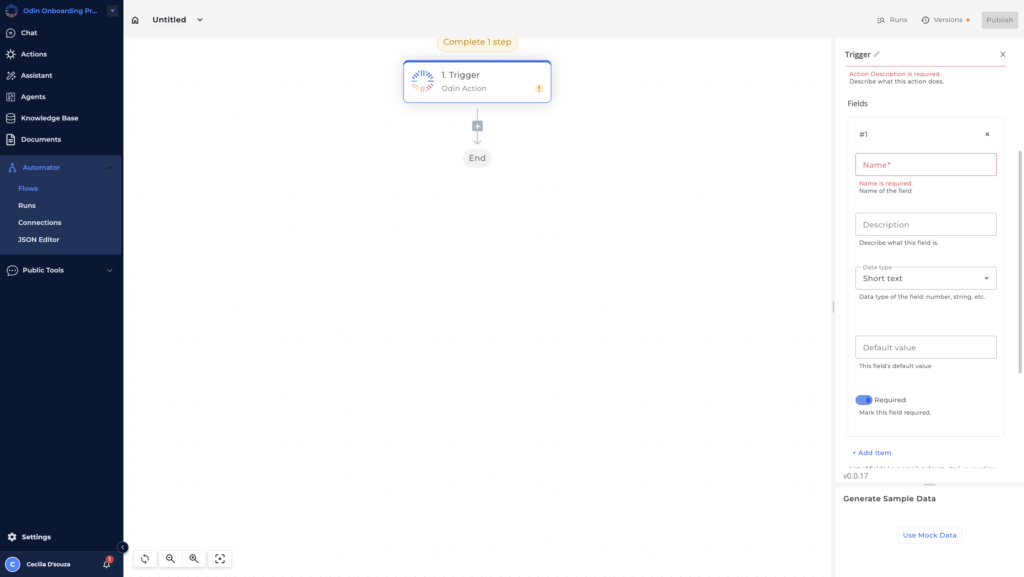
- Next, add fields for the values you will be inputting. Click ‘Add Item’ and create a field named ‘Topic.’ For its description, use ‘This is the topic for the article.’ Select ‘Short Text’ as the input type and set a default value if desired, such as ‘Using AI to improve efficiency in your job.’
- You can also add additional fields, such as the category or even the genre of the article. For simplicity, we will keep it short and proceed.
- At the bottom, you’ll notice a ‘Confirm’ button. This button defaults to ‘Confirm’ and can also be labeled as ‘Start Writing’ or any other label you prefer. There’s also an option for ‘Auto-Confirm,’ which you can leave off for now. We’ll cover what this does later.
- You can also add additional fields, such as the category or even the genre of the article. For simplicity, we will keep it short and proceed.
Want to ditch the boring stuff? Create your flow today!
- Connecting the Blog Outliner and Blog Writer Agents within the Flow
- Click on ‘Use Mock Data’ to generate a template for the automator. This will create a JSON structure for the topic you will use in the next step.
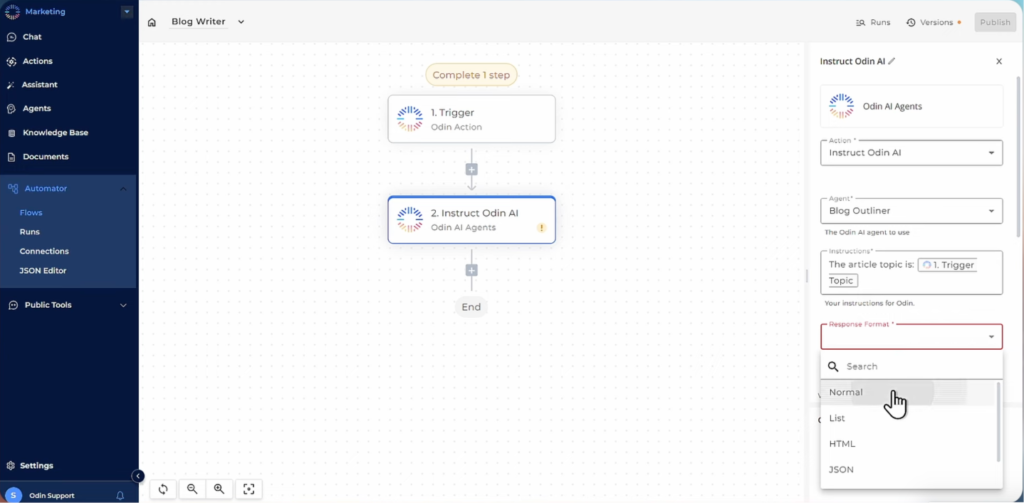
We have around 180 plus actions that you can take with Odin and you can create complex Logics such as branching coding hashing data, date helpers, etc. - Click on the plus icon again to add another action. Select ‘AI Agent’ under ‘AI Pieces’ and then ‘Instruct Odin AI.’
- Choose the ‘Blog Outliner’ agent, as you need to provide the topic to the Blog Outliner similar to how it was done manually in the chat page. Insert the topic field variable to ensure the correct topic is used.
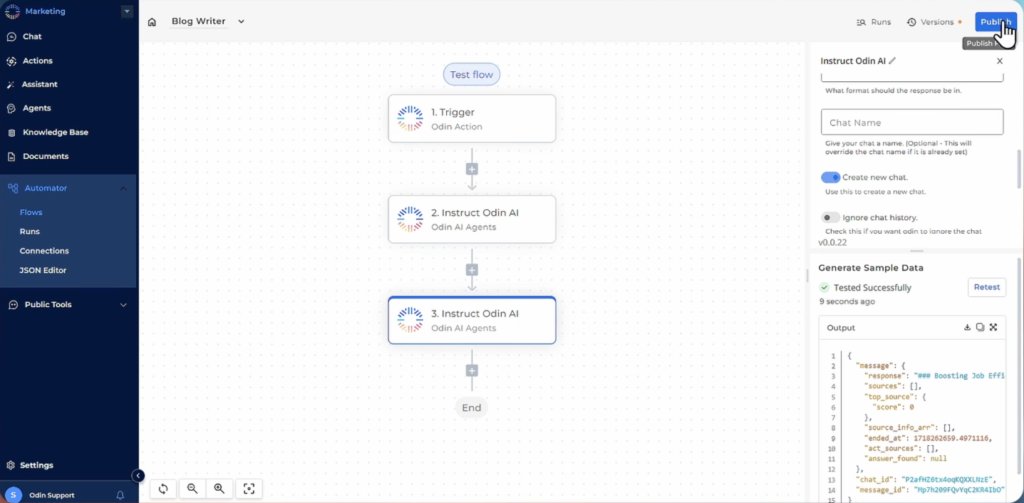
- Scroll down to adjust settings like chat name and history as needed, then click ‘Test Step’ to see the output. This output will be a JSON structure that you can use in the next step.
- Add another action by clicking the plus icon again. Select ‘AI Agent’ and ‘Instruct Odin AI’ once more. This time, choose the ‘Blog Writer’ agent.
- For the instructions, input the response from the previous Blog Outliner agent. Use the ‘Message’ field to pass the outline from the Blog Outliner to the Blog Writer.
- Ensure the response format is set to ‘Normal,’ and adjust any additional settings like chat name if needed. Click ‘Test Step’ to see the blog content generated from the outline.
- Click on ‘Use Mock Data’ to generate a template for the automator. This will create a JSON structure for the topic you will use in the next step.
- Once the testing is complete and everything is functioning as expected, click ‘Publish’ to finalize your flow.
Recommended Reading
“Create Custom Chatbots: A No Code Solution by Odin AI”
Creating and Managing Documents
Generating Documents from Articles
Using Odin AI’s native document editor, you can effortlessly create documents from your generated articles. This step is crucial in transforming your written content into shareable formats, enhancing the overall efficiency of your task automation process.
- Setting Up Document Creation Steps Within the Automator
- To start, navigate back to the automator and click on ‘Flows.’ Select the flow you want to modify or create a new one.
- Click on the plus icon to add a new action. Choose ‘AI Tools’ and then select ‘Create Document.’
- To start, navigate back to the automator and click on ‘Flows.’ Select the flow you want to modify or create a new one.
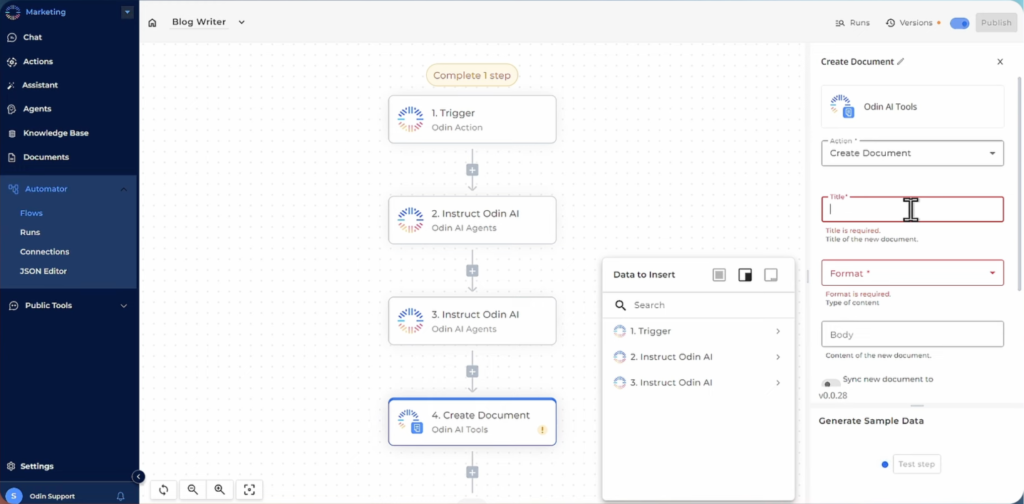
- You can create a title for your document, such as ‘New Blog.’ Alternatively, you can set up a step within the flow to dynamically generate a title.
- Select the format for your document output. Options include text, markdown, or HTML. For this example, we’ll choose markdown.
- Define the body of the document by selecting the response from the Blog Writer agent. This ensures that the content generated by the agent is included in the document.
- To keep your system organized, rename the outputs from your agents accordingly. For instance, label them as ‘Blog Outliner’ and ‘Blog Writer.’
- After setting this up, click ‘Test Step’ to verify that the document creation process works as expected.
- Once confirmed, click ‘Publish’ to finalize the setup.
- You can create a title for your document, such as ‘New Blog.’ Alternatively, you can set up a step within the flow to dynamically generate a title.
Let’s automate those pesky tasks—reach out to us today!
- Running the Document Creation Action
- Go to the ‘Nav Actions’ tab. Creating an action here also creates actions in your actions tab, which can be attached to other agents that perform these actions.
- Run the action directly from here by clicking ‘Run.’ Notice the default value set in the automator, such as “Using AI to improve efficiency in your job.”
- For a different topic, input something like “AI and positive effects on jobs” and click ‘Confirm.’ This starts the execution of the automation.
- Follow the progress in the new chat that appears, where Odin AI writes the sections and automatically kicks off the next action to write the article.
- You can improve the personality settings to avoid repetitive section labels and provide additional resources.
- Go to the ‘Nav Actions’ tab. Creating an action here also creates actions in your actions tab, which can be attached to other agents that perform these actions.
Recommended Reading
“Top 10 Conversational AI Trends to Dominate Customer Experience in 2024”
Testing and Publishing Documents
- Testing the Document Creation Process
- After generating the article, take the content and create a document. Go back to the automator and click ‘Flows.’
- Click on your flow, then the plus icon to add a new action. Ensure your versions are stored so you can revert to previous versions if needed.
- Using Odin AI’s native document editor, connect all the information and push the response from the blog into the editor. For simplicity, use Odin’s document editor instead of Google Docs.
- Define the document settings and select the Blog Writer output for the body of the document. Click ‘Test Step’ to ensure everything works correctly.
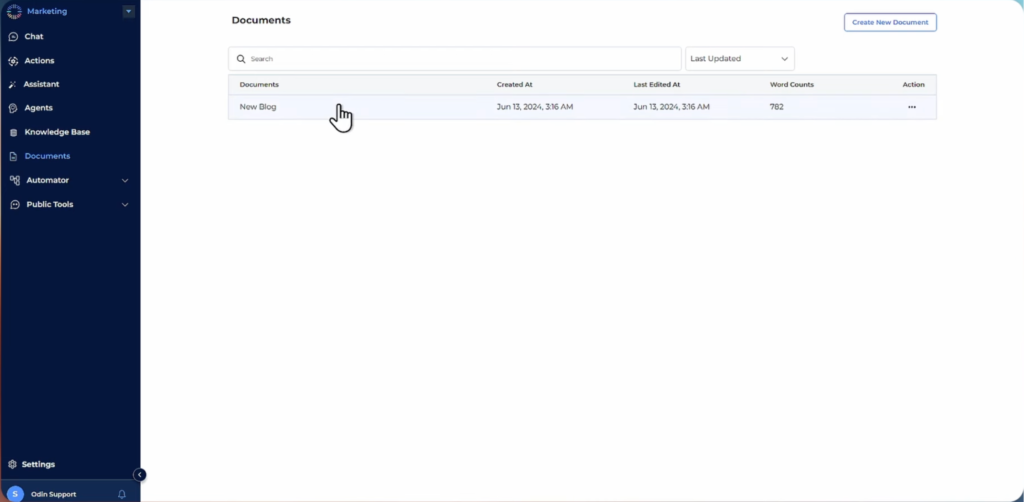
- Publish the changes and navigate to the ‘Documents’ section. You should see the new blog document created during the test step.
- After generating the article, take the content and create a document. Go back to the automator and click ‘Flows.’
- For demonstration purposes, delete the initial test document to show how the process works.
- Publishing the Final Document
- Return to the ‘Actions’ tab and click ‘Run.’ For a new topic, input something like “How humans can live on Mars” and click ‘Confirm.’
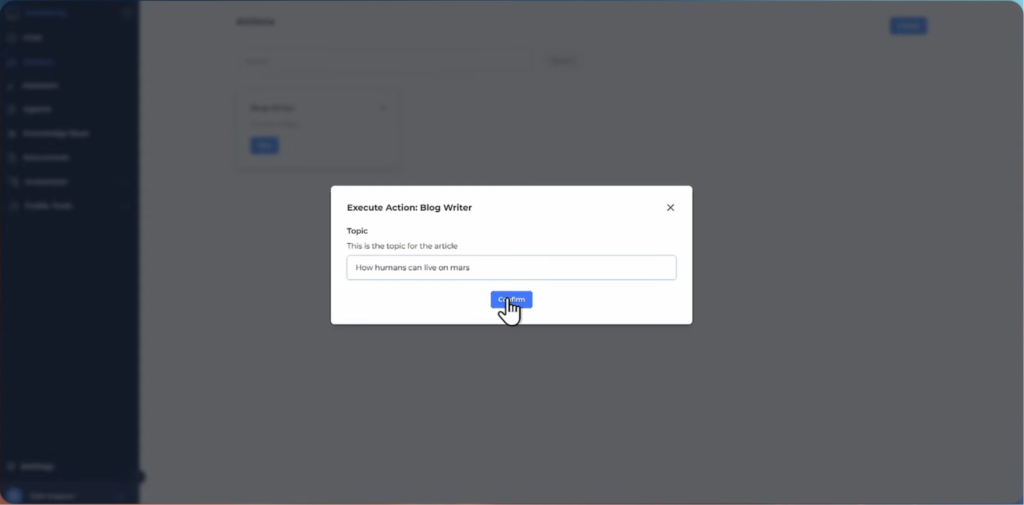
- Odin AI will execute the automation, generating an article outline, writing the full article, and creating the document.
- Odin AI will execute the automation, generating an article outline, writing the full article, and creating the document.
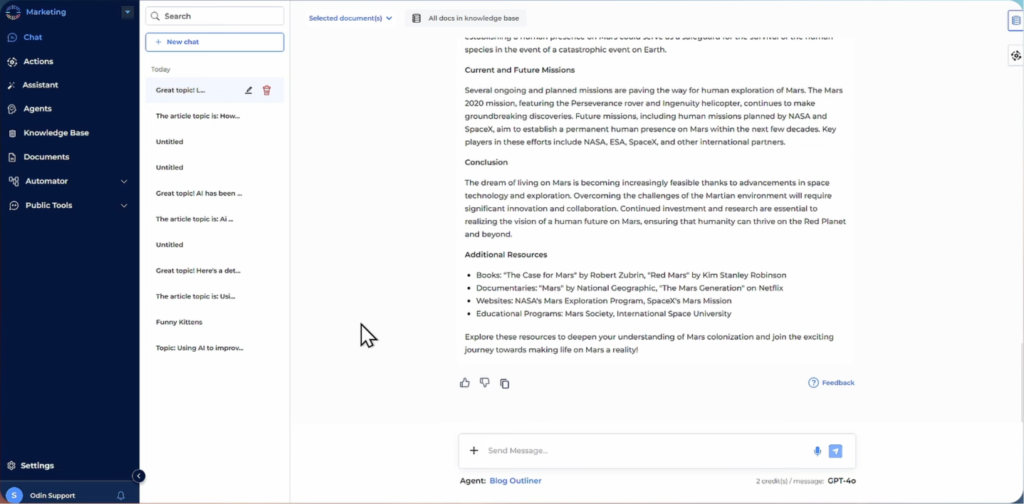
- Once completed, navigate back to the ‘Documents’ section. You should see a new document titled with your topic, such as “How humans can live on Mars,” containing the full article.
- Customize and edit the document within Odin AI’s editor or pass it to another agent for proofreading, enhancing SEO keywords, or other modifications.
- Review the final document, which might show 777 words or similar output based on the default value. Customize it further if needed or optimize it for SEO.
Recommended Reading
“10 Best Practices for Training an AI Chatbot: Top Strategies”
Additional Automation
Pushing Content to External Platforms
With Odin AI, you can seamlessly push your blog content to external platforms like WordPress, enhancing the reach and impact of your articles. This section will guide you through setting up actions to automate content posting using HTTP requests.
- Setting Up Actions to Push Content to Platforms Like WordPress
To start, navigate to the automator, click on ‘Flows,’ and create a new flow from scratch.
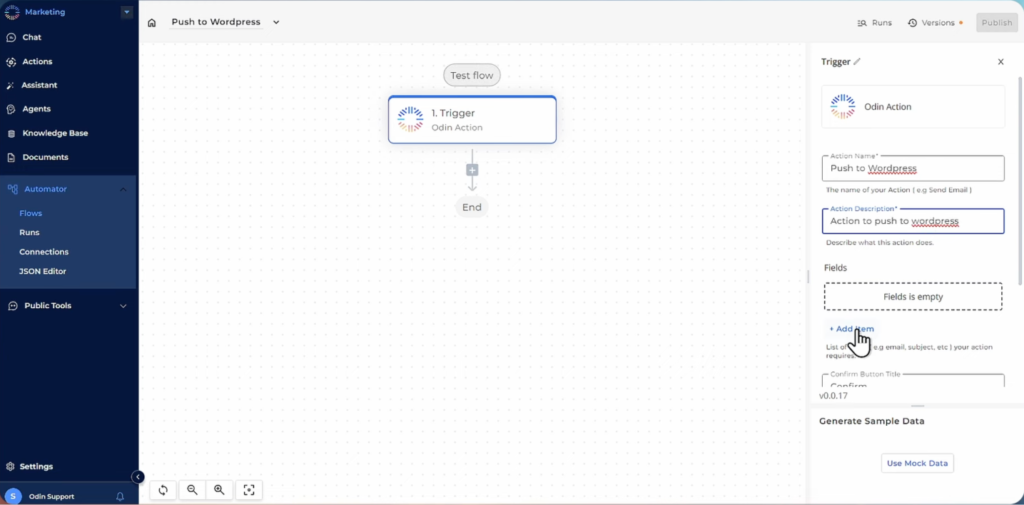
- For the trigger, go to AI events and add an Odin action. Name this action ‘Push to WordPress’ or another suitable name.
- In the Field section, add a field and name it ‘Document.’ Select the document type, leaving it blank for now. You can choose to enable ‘Auto Confirm,‘ but for this example, leave it off.
- Click on ‘Mock Data’ to generate a template for the automator to use.
- For the trigger, go to AI events and add an Odin action. Name this action ‘Push to WordPress’ or another suitable name.
- Using HTTP Requests to Automate Content Posting
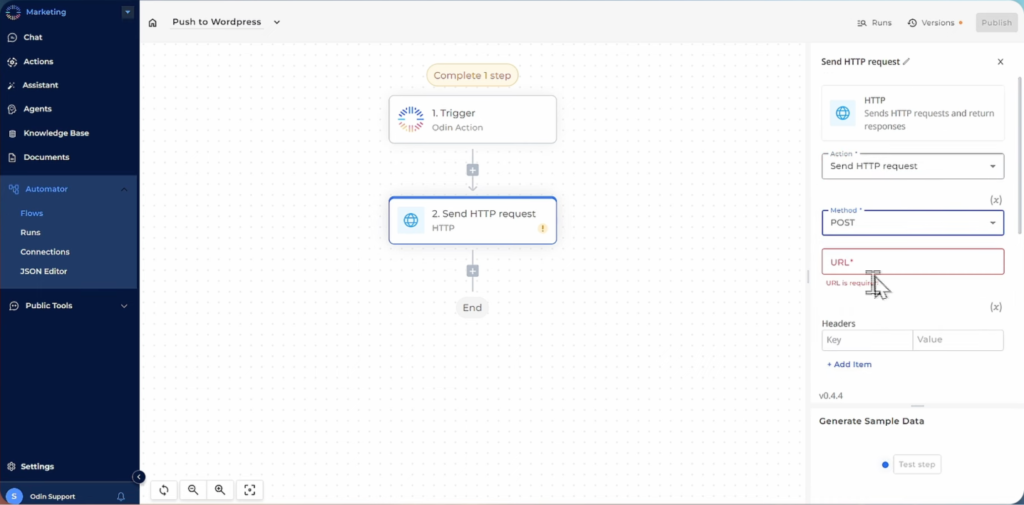
- Next, add an item to send an HTTP POST request. Click ‘Action,’ then ‘Send HTTP Request,’ and select ‘POST.’
- Enter the URL of your WordPress site or another platform where you want to post the content. This example uses a site that is waiting for incoming posts.
- Leave the headers empty, set the body type to ‘Raw,’ and input the document content into the body field.
- Test the setup to ensure everything is working correctly. You should see a response indicating the post was successful.
- Next, add an item to send an HTTP POST request. Click ‘Action,’ then ‘Send HTTP Request,’ and select ‘POST.’
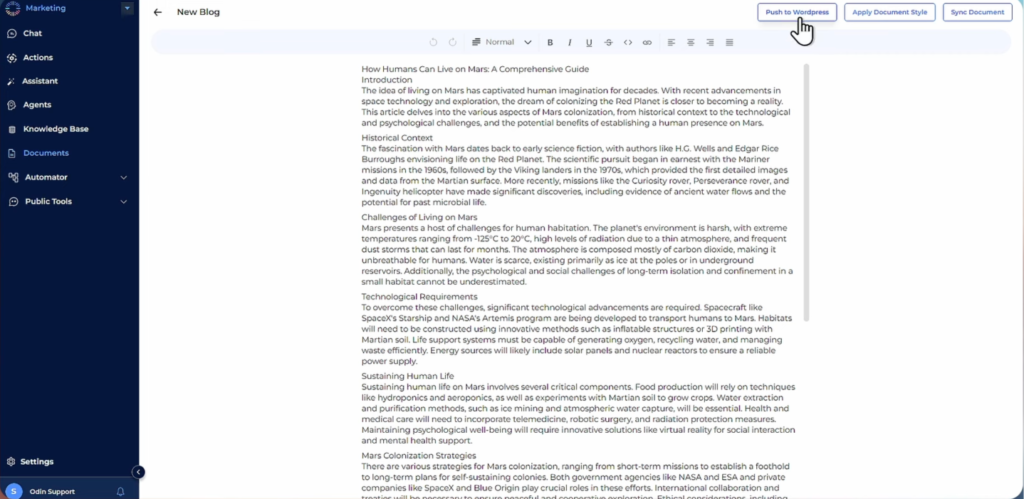
Publish the changes and go to your documents. You should see a new button labeled ‘Push to WordPress.’
- Running the Automation
- Click the ‘Push to WordPress’ button to run the flow. A confirmation popup will appear; click ‘Confirm’ to proceed.
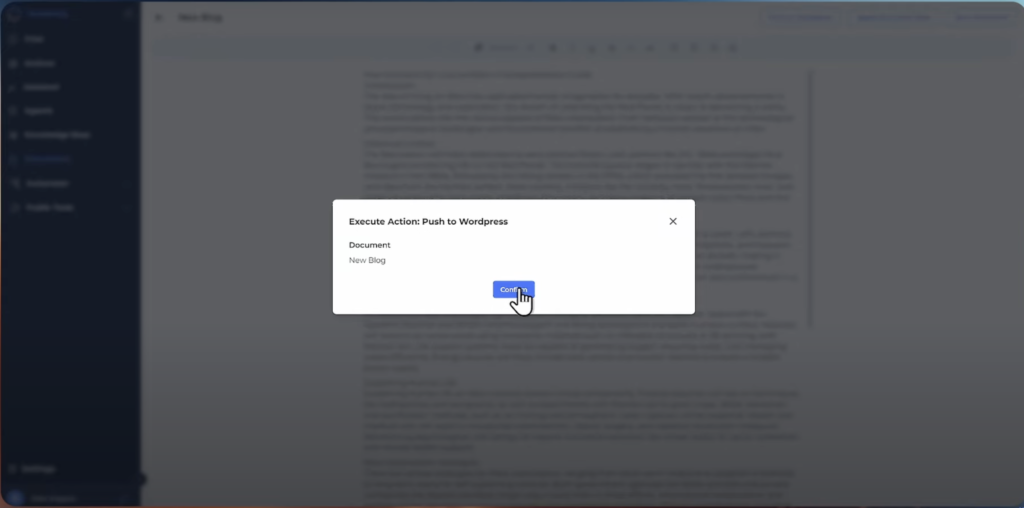
- The document content will be sent to the specified URL, and you can verify the new post on your WordPress site or other platform.
Recommended Reading
“How Odin AI is Changing the Customer Service Dynamics of Call Center Operations?”
Customizing Actions and Triggers
Customizing actions and triggers allows you to tailor the automation process to your specific needs, optimizing task management. This flexibility enables you to create agents that trigger actions based on various criteria, making your task automation even more powerful.
- Creating an Agent That Can Trigger Actions Based on Specific Topics
- To illustrate this, let’s create a new agent called ‘Simple Full Agent.’
- Navigate to the agents tab, click ‘Create New Agent,’ and name it ‘Simple Full Agent.’
- Customize the personality to be a helpful assistant with minimal creativity.
- Add the necessary blocks, such as user identification, long-term memory, and rules.
- In the actions tab, add the previously created ‘Blog Writer’ action.
- Set up the agent to understand and pick up the topic, then trigger the action to write a blog based on that topic.
- To illustrate this, let’s create a new agent called ‘Simple Full Agent.’
- Testing the Custom Agent
- Save the agent and go to the chat section. Select the ‘Simple Full Agent’ and input a topic like “funny kittens.”
- The Odin action will automatically detect the topic and pre-fill it. Click ‘Send’ to trigger the action.
- The agent will write the outline and then the full blog about the given topic. This process demonstrates how easy it is to create and manage content using customized agents and task automation tools.
- Save the agent and go to the chat section. Select the ‘Simple Full Agent’ and input a topic like “funny kittens.”
The steps outlined demonstrate how different agents in Odin AI can work together to create seamless automations, from generating content to publishing it on various platforms.
Recommended Reading
“How AI Can Future-proof Your Contact Center”
WE ENCOURAGE YOU TO EXPERIMENT
Ready to spice up your workflow?
Don’t be shy—dive into task automation and automate tasks like a pro!
Play around with different settings and task automation tools to see what works best for you. Whether it’s automating repetitive tasks or trying out new automation task software, the sky’s the limit.
Get creative, have fun, and discover the endless possibilities of automated tasks!
If you enjoyed this tutorial, don’t forget to hit that subscribe button and give us a thumbs up! We love hearing from you, so drop your comments below with any suggestions for future content.
Feel the joy of seeing your work done effortlessly!!
Have more questions?
Contact our sales team to learn more about how Odin AI can benefit your business.
FAQs
Task automation refers to using task automation software and task automation tools to perform repetitive tasks without human intervention, enhancing efficiency and accuracy.
You can automate tasks with Odin AI by creating flows that use specialized agents to handle specific tasks such as generating blog outlines and writing full articles. This process is managed through the Odin AI automator.
To handle repetitive tasks, use task automation tools like Odin AI. Set up workflows that automate these tasks, reducing manual effort and freeing up your time for more strategic activities.
An example of a task that could be automated is generating blog outlines and articles. Using Odin AI, you can create flows that handle the entire content creation process from start to finish.
Odin AI is considered among the best task automation software for its advanced AI capabilities, ease of use, and ability to automate a wide range of tasks efficiently.
You can automate computer tasks using software applications that run automated scripts, macros, or workflows. Odin AI allows you to set up flows that automate tasks such as data entry, file management, and content creation.
To automate tasks at your job, identify repetitive processes that can be streamlined, and use task automation software like Odin AI to create workflows that handle these tasks automatically.
Task automation tools are software applications that help you automate repetitive tasks. Odin AI provides a suite of tools that make it easy to set up and manage automated workflows.
To set up a task automation flow, log into Odin AI, navigate to the automator, create a new flow, and define the triggers and actions. Connect the necessary agents like Blog Outliner and Blog Writer to automate the entire process.
Task automation increases productivity, reduces errors, saves time, and cuts operational costs. It allows you to focus on more strategic tasks by automating mundane, repetitive processes.