Structured data management is crucial for modern organizations striving to maintain efficiency and ensure accuracy throughout. Without a well-organized knowledge base and effective knowledge base management, information retrieval becomes cumbersome, leading to wasted time and resources. Many organizations struggle with this as their knowledge base systems often lack the necessary structure to handle vast amounts of data types and content effectively.
To address these challenges, Odin AI has introduced the “Data Type” feature in its knowledge base software. This innovative tool is designed to optimize knowledge management by ensuring that information is categorized and structured in a way that enhances accessibility and searchability. Odin AI‘s mission is to simplify the organization and retrieval of information within knowledge bases, ensuring that support teams and users can easily access the relevant information they need.
This blog will explore how Odin AI’s “Data Type” feature can significantly enhance the organization, searchability, and utility of your knowledge base. By understanding and utilizing different data types, you can create a more efficient and effective knowledge base, leading to improved productivity and better customer satisfaction.
Level up your knowledge base with Data Types!
Recommended Reading
What Is a Knowledge Base? Complete Beginner’s Guide 2024
What is a Data Type?
Definition Of A Data Type
Data types in the context of Odin AI are essential building blocks within its knowledge base framework. A data type serves as a structured blueprint that defines how different pieces of information are organized, stored, and retrieved. It categorizes the various forms of data—such as text, numbers, dates, and more—into specific formats, ensuring consistency and accuracy across the knowledge base. A well-defined data type can help in creating a well-structured knowledge base article by providing a clear format for presenting detailed and organized information.
By using data types, Odin AI allows organizations to create a well-organized knowledge base where each piece of data is stored according to its type, making it easier to search, filter, and retrieve relevant information. For example, a data type might specify that a “title” should always be a string, while a “date” should follow a specific format. This structured framework not only enhances the search functionality of the knowledge base but also ensures that the information is easily accessible and manageable for support teams and users.
Recommended Reading
Using AI Agents For Technical Document Search: A Detailed Case Study
Importance of Structured Data in Knowledge Management
Enhanced Searchability
Structuring data with defined data types ensures that information in the knowledge base is easily searchable. This enables users and support teams to quickly find relevant information, leading to faster, more accurate responses.Consistency Across the Knowledge Base
Using data types enforces consistency in storing and categorizing data. This uniformity helps maintain a well-organized knowledge base and prevents errors.Improved Data Retrieval
Organized data types make data retrieval easier. The knowledge base system efficiently filters and sorts data based on type, ensuring users access the most relevant content quickly.Better Knowledge Management
Structured data is key to effective knowledge management. Organizing data into distinct types keeps the knowledge base up-to-date, accurate, and useful for support teams and customers.Efficient Use of Knowledge Base Tools
Knowledge base tools work best when data is well-structured. Tools like search engines and filters rely on defined data types to provide precise results, enhancing the customer experience.Facilitates Knowledge Sharing
A structured knowledge base makes knowledge sharing easier across the organization. Whether it’s onboarding materials or troubleshooting guides, organized data ensures easy access, promoting knowledge sharing.Support for Continuous Improvement
Structured data simplifies updates and maintenance of the knowledge base. New information integrates seamlessly, keeping the knowledge base a helpful resource over time.
Recommended Reading
How to Extract Text from PDF Files in Minutes
How Does It Work
Defining Fields
Each data type outlines specific fields that are relevant to the data it categorizes.
For example, in a customer knowledge base, a data type might define fields such as “customer name,” “email address,” and “support ticket number.” This ensures that every entry in the knowledge base contains the necessary information, making it easier for support teams to find and use relevant information.
Establishing Relationships
Data types also help in establishing relationships between different pieces of data.
For instance, in an internal knowledge base software, a data type might link an “employee name” field to “department” and “role,” creating a clear connection between these pieces of information. This relational structure enhances the search functionality of the knowledge base, allowing users to retrieve interconnected information efficiently.
Ensuring Consistent Formats
By defining formats for each field, data types ensure that data is consistently entered and displayed across the knowledge base.
For example, a data type might require that a “date” field follows a specific format (e.g., YYYY-MM-DD) or that a “phone number” field includes a country code. This uniformity not only improves data retrieval but also ensures that the knowledge base remains up to date and accurate.
Recommended Reading
How AI-Powered Knowledge Base Helps Optimize Customer Support Processes
How to Create a Data Type on Odin AI
Creating a data type in Odin AI is a straightforward process that significantly enhances the organization of your knowledge base. Here’s how you can get started:
Navigate to the Knowledge Base
Begin by accessing the “Knowledge Base” section within your project.
Select the Data Types Tab
Click on the “Data Types” tab to manage or create new data types.
Click on the “Create Data Type” Button
Initiate the creation of a new data type by clicking the “Create Data Type” button.
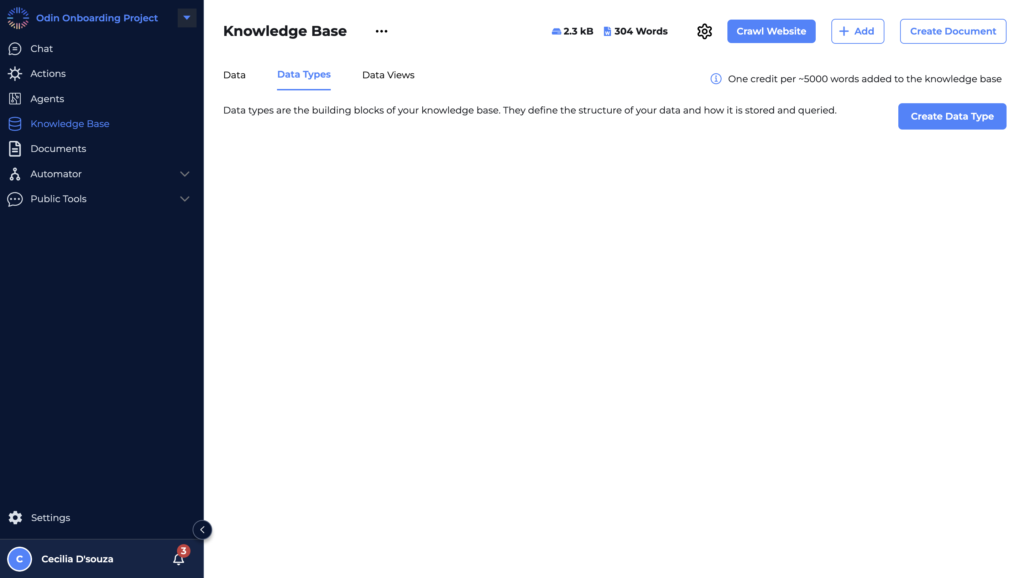
After clicking the “Create Data Type” button, you’ll be directed to a screen where you can define the schema for your data type. This step is crucial for structuring your data according to the specific needs of your project.
Before diving into the details of creating data types, it’s important to understand the concept of a schema and why it’s essential for effective knowledge management.
Understanding Schema in Odin AI
A schema in Odin AI is a structured framework that guides the Language Model (LLM) on what specific information to look for when you upload a document. It acts as a blueprint, defining the format, structure, and types of data within a document. This allows the LLM to efficiently understand, extract, and retrieve relevant information. By using a schema, you help the LLM align search queries with predefined data fields, ensuring more accurate and targeted results from the knowledge base.
Why Schema is Important
When working with large datasets or a knowledge base filled with diverse information, simply storing data isn’t enough. The data needs to be organized in a consistent and logical manner to ensure efficient retrieval and utilization. This is where a schema becomes vital.
A schema defines the types of data fields (like strings, numbers, dates, etc.), their relationships, and their expected formats. This structure ensures that all data entered into the system adheres to a specific format, which is crucial for maintaining consistency and accuracy. A well-defined schema is essential for maintaining an effective online knowledge base.
Defining the Schema
On this screen, you’ll find a large text editor where you can begin writing the schema.
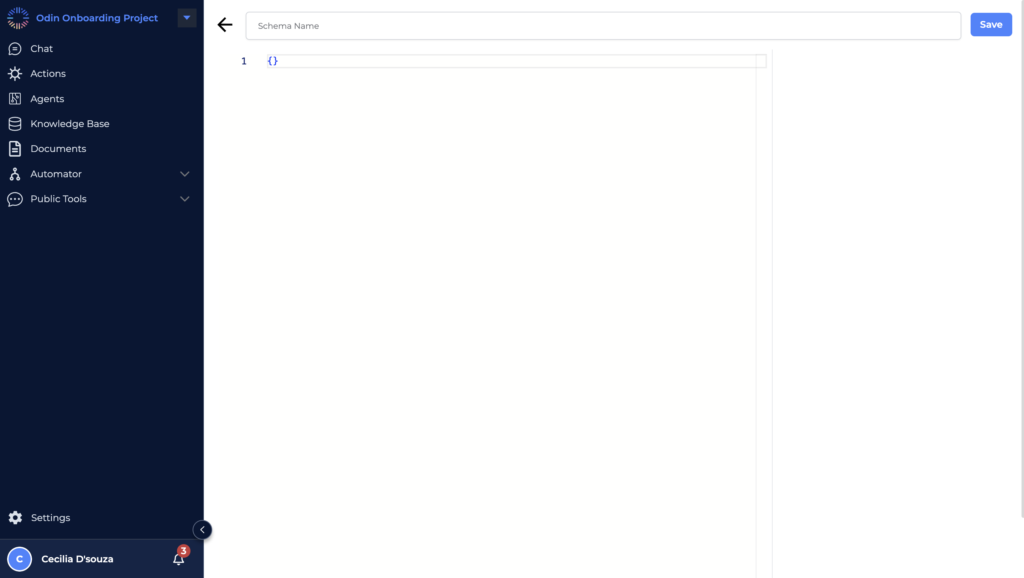
Schema Name
At the top, input a unique name for your data type in the “Schema Name” field. This name will serve as the identifier for the structure you’re about to create.
Blank Editor
The editor is initially blank, allowing you the freedom to define your schema from scratch. Typically, schemas are defined in a JSON-like format, setting up key-value pairs that represent the different properties of your data.
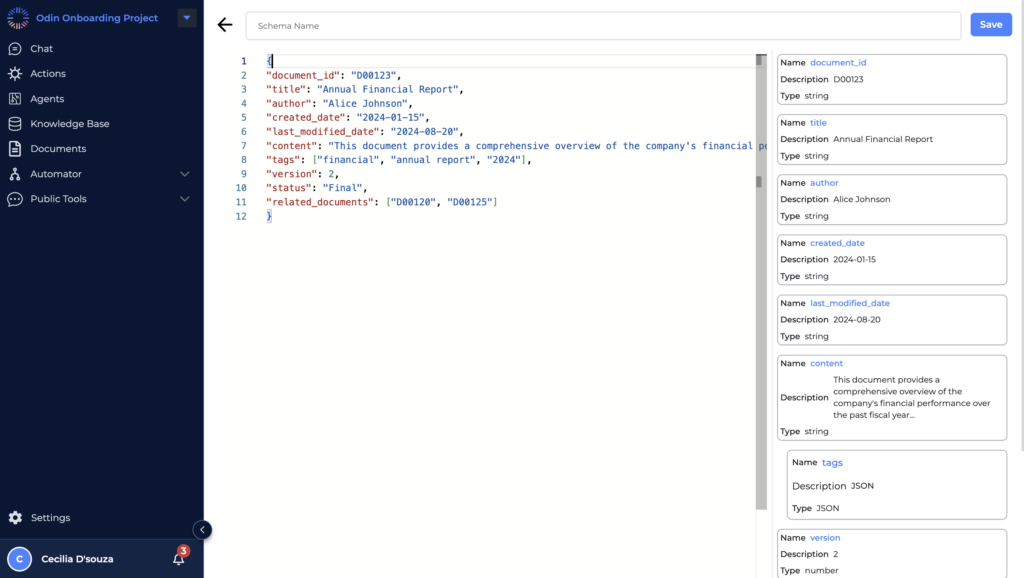
Examples of Schemas
To clarify further, let’s look at a few examples:
Document Schema Example
{
"document_id": "D00123",
"title": "Annual Financial Report",
"author": "Alice Johnson",
"created_date": "2024-01-15",
"last_modified_date": "2024-08-20",
"content": "This document provides a comprehensive overview of the company's financial performance over the past fiscal year...",
"tags": ["financial", "annual report", "2024"],
"version": 2,
"status": "Final",
"related_documents": ["D00120", "D00125"]
} Explanation:
- Document ID: A unique identifier for the document (string).
- Title: The title of the document (string).
- Author: The name of the person who authored the document (string).
- Created Date: The date the document was originally created (date).
- Last Modified Date: The date when the document was last modified (date).
- Content: The main body of the document (string or structured format).
- Tags: Keywords or topics related to the document (array of strings).
- Version: The version number of the document (number).
- Status: The current status of the document (string).
- Related Documents: IDs of related documents (array of strings).
Employee Record Schema
For a Data Type that manages employee information, the schema might be:
{
"employeeID": "E9876",
"name": {
"firstName": "Jane",
"lastName": "Smith"
},
"position": "Software Engineer",
"department": "IT",
"hireDate": "2022-08-01",
"salary": 85000,
"contactInfo": {
"email": "jane.smith@company.com",
"phone": "+1234567890"
},
"managerID": "E1234",
"employmentStatus": "Full-Time"
} Explanation:
- Employee ID: A unique identifier for the employee, stored as a string.
- Name: An object containing the first and last names of the employee.
- Position: The employee’s job title.
- Department: The department where the employee works.
- Hire Date: The date when the employee was hired.
- Salary: The employee’s annual salary, stored as a number.
- Contact Info: An object containing the employee’s contact information (email and phone).
- Manager ID: The ID of the employee’s direct manager.
- Employment Status: The employment status, such as “Full-Time” or “Part-Time.”
Product Inventory Schema
If you are managing an inventory of products, your schema might include:
{
"product_id": "P98765",
"name": "Laptop",
"price": 1200,
"stock_quantity": 150,
"category": "Electronics"
}
Explanation:
- Product ID: A unique string identifier for the product.
- Name: The name of the product.
- Price: The price of the product as a number.
- Stock Quantity: The number of items available in stock.
- Category: The category under which the product is listed.
Customer Data Schema
A schema designed for storing customer information might look like this:
{
"customerID": 1023,
"firstName": "John",
"lastName": "Doe",
"email": "john.doe@example.com",
"phoneNumber": "+1234567890",
"address": {
"street": "123 Main St",
"city": "Springfield",
"state": "IL",
"postalCode": "62701",
"country": "USA"
},
"dateOfBirth": "1985-05-15",
"accountBalance": 250.75,
"membershipStatus": "Gold"
}
Explanation:
- CustomerID: A unique identifier for the customer, stored as a number.
- FirstName, LastName: Strings representing the customer’s first and last names.
- Email: A string field for the customer’s email address.
- PhoneNumber: A string field for the customer’s contact number.
- Address: An object containing nested fields (street, city, state, postalCode, country) that represent the customer’s address.
- DateOfBirth: A date field for the customer’s birthdate.
- AccountBalance: A numerical field representing the customer’s account balance.
- MembershipStatus: A string that indicates the customer’s membership level (e.g., Gold, Silver, etc.).
Sales Transaction Schema
For recording sales transactions, the schema might be structured as follows
{
"transactionID": "T2024001",
"customerID": "1023",
"transactionDate": "2024-08-27",
"itemsPurchased": [
{
"productID": "P001",
"quantity": 2,
"pricePerUnit": 29.99
},
{
"productID": "P002",
"quantity": 1,
"pricePerUnit": 49.99
}
],
"totalAmount": 109.97,
"paymentMethod": "Credit Card",
"shippingAddress": {
"street": "123 Main St",
"city": "Springfield",
"state": "IL",
"postalCode": "62701",
"country": "USA"
}
}
Explanation:
- TransactionID: A unique identifier for the transaction.
- CustomerID: The ID of the customer who made the purchase.
- TransactionDate: The date when the transaction took place.
- ItemsPurchased: An array of objects, each representing an item purchased in the transaction. Each object contains the product ID, quantity purchased, and the price per unit.
- TotalAmount: The total amount for the transaction.
- PaymentMethod: The method of payment used for the transaction (e.g., Credit Card).
- ShippingAddress: An object with fields that represent the shipping address for the transaction.
Project Management Schema
For managing project information, the schema might look like this:
{
"projectID": "PRJ001",
"projectName": "Website Redesign",
"startDate": "2024-07-01",
"endDate": "2024-12-31",
"teamMembers": [
{
"employeeID": "E9876",
"role": "Project Manager"
},
{
"employeeID": "E6543",
"role": "UX Designer"
},
{
"employeeID": "E3456",
"role": "Frontend Developer"
}
],
"budget": 50000,
"status": "In Progress",
"milestones": [
{
"milestoneID": "M001",
"description": "Initial Wireframes",
"dueDate": "2024-08-15",
"completed": true
},
{
"milestoneID": "M002",
"description": "Prototype Development",
"dueDate": "2024-09-30",
"completed": false
}
]
}
Explanation:
- Project ID: A unique identifier for the project.
- Project Name: The name of the project.
- StartDate, EndDate: The start and end dates for the project.
- Team Members: An array of objects representing the team members working on the project, each with an employee ID and their role in the project.
- Budget: The budget allocated for the project.
- Status: The current status of the project (e.g., “In Progress”).
- Milestones: An array of objects, each representing a milestone within the project. Each milestone has a unique ID, description, due date, and a boolean indicating whether it has been completed.
Customer Support Ticket Schema
For Customer Support ticket information, the schema might look like this:
{
"ticket_id": "TCKT-67890",
"customer_name": "Jane Smith",
"issue_description": "Unable to login to account",
"priority": "High",
"status": "Open",
"date_submitted": "2024-08-15",
"assigned_to": "Support Agent 1"
}
Explanation:
- Ticket ID: A unique identifier for each support ticket.
- Customer Name: The name of the customer who submitted the ticket.
- Issue Description: A description of the issue the customer is facing.
- Priority: The priority level of the ticket (e.g., Low, Medium, High).
- Status: The current status of the ticket (e.g., Open, In Progress, Closed).
- Date Submitted: The date the ticket was submitted.
- Assigned To: The support agent responsible for handling the ticket.
Saving Your Schema
Once you have defined all the necessary fields and are satisfied with the structure, simply click the “Save” button located at the top right of the screen. Saving your schema finalizes the creation of your data type, making it available for use within the knowledge base. This step is a crucial part of knowledge base management, as it ensures that the information is accurately maintained and updated.
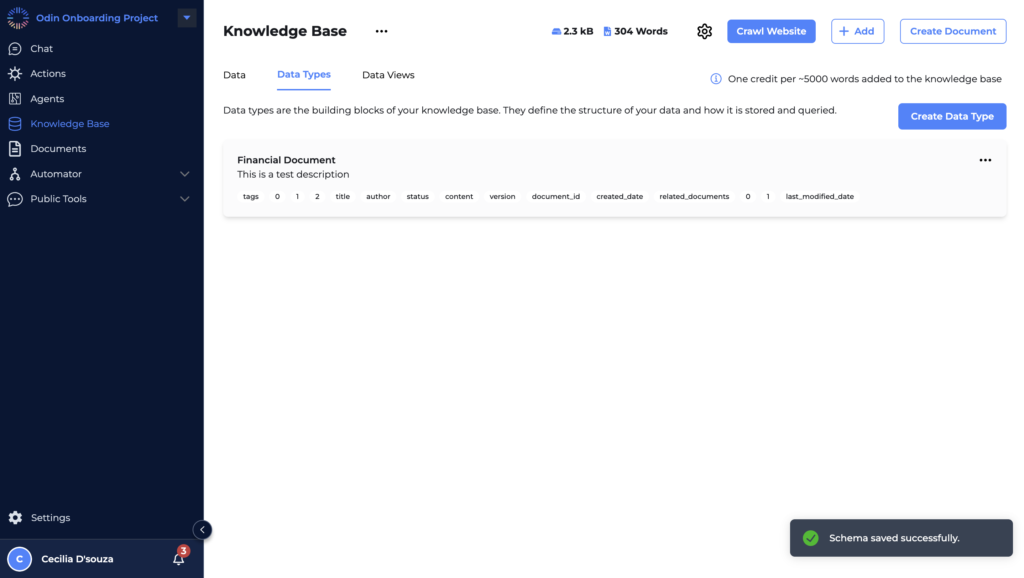
Practical Implications
By defining a clear schema, you are essentially training the LLM to understand the structure and relationships within your data. This, in turn, enhances the LLM’s capability to perform more sophisticated and accurate searches, providing users with relevant and precise information from the knowledge base.
The schema acts as a powerful tool to bridge the gap between raw data and intelligent information retrieval, making your knowledge base a more effective resource.
Get started with Data Types today!
Recommended Reading
Odin’s AI Powered Knowledge Base: Revolutionizing Information Management
Applying a Data Type to Existing Data in the Knowledge Base
One of the powerful features of Odin AI is the ability to apply a data type to existing data within your knowledge base. This ensures that even previously uploaded documents and datasets can benefit from structured organization and enhanced search capabilities provided by data types.
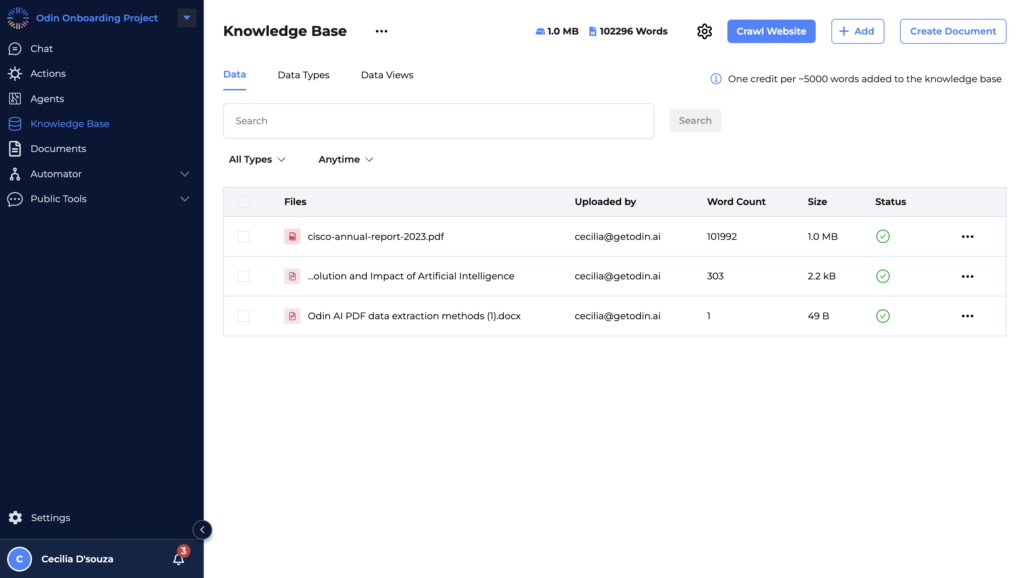
Step-by-Step Guide: Applying a Data Type
Select the Document
- Navigate to the document or dataset you wish to apply a data type to within the knowledge base. For instance, a document named “cisco_annual_report_2023.pdf.”
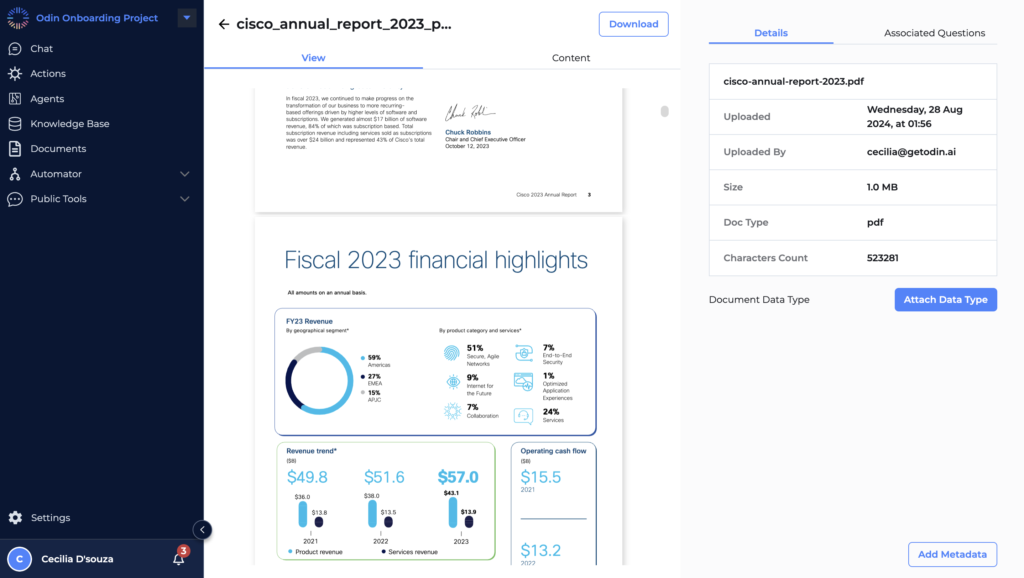
Click on ‘Attach Data Type’
- On the right-hand side of the screen, under the document details section, click the “Attach Data Type” button. This opens a window where you can select the appropriate data type.
- On the right-hand side of the screen, under the document details section, click the “Attach Data Type” button. This opens a window where you can select the appropriate data type.
Choose or Create a Data Type
- In the pop-up window, you can either select an existing Data Type that suits the document or create a new one. For example, if the document is a financial report, you might select a “Financial Document” Data Type, which already has fields like title, author, created_date, etc., defined.
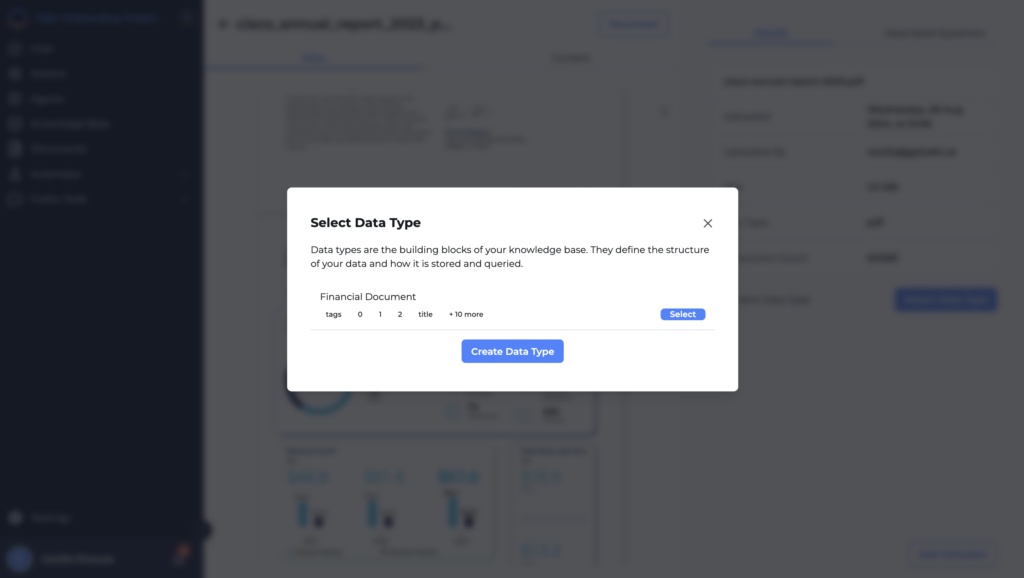
- If no suitable Data Type exists, you can create a new one tailored to the specific needs of the document.
- If no suitable Data Type exists, you can create a new one tailored to the specific needs of the document.
Finalize the Application
- After selecting or creating the data type, click “Select” to apply it to the document. This aligns the document’s data with the predefined schema, ensuring consistency in how the information is stored and queried.
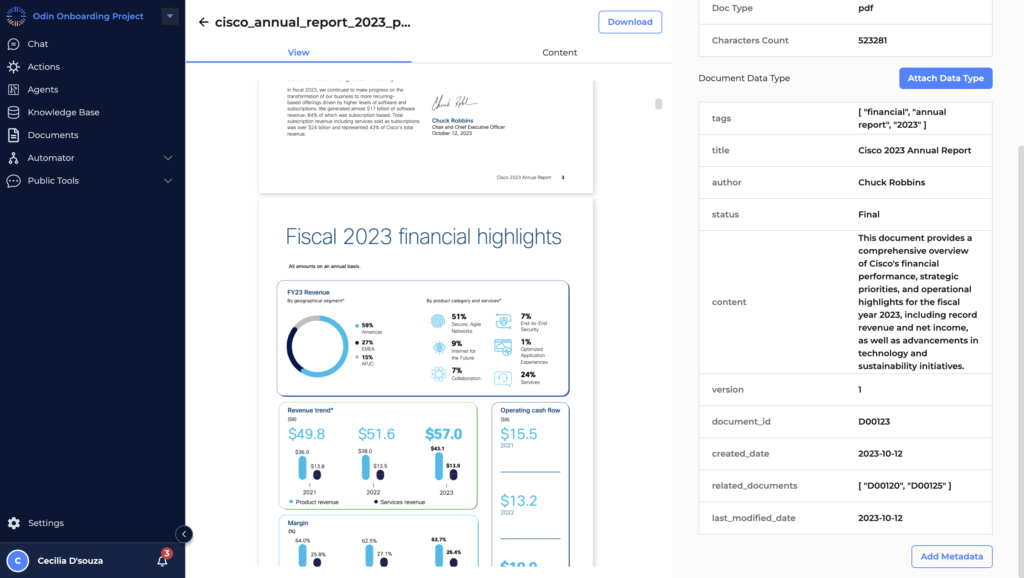
Example: Applying a Financial Document Data Type
Let’s consider the example where you apply a “Financial Document” Data Type to the Cisco Annual Report 2023 PDF.
- After attaching the Data Type, the system will organize the document’s data according to the schema defined in the Financial Document Data Type. This might include fields such as Document ID, Title, Author, Created Date, and more.
- This structured approach not only standardizes how the document’s data is managed but also enhances the search capabilities of the LLM. For instance, if a user searches for “Cisco’s 2023 financial highlights,” the system can more accurately retrieve the relevant sections of the report by referencing the specific fields defined in the schema.
Viewing Data with Applied Data Types
Once a Data Type is applied, you can easily view and manage all documents with the same Data Type within the “Data Views” tab. This tab aggregates documents based on their assigned Data Type, providing an organized view of your Knowledge Base.
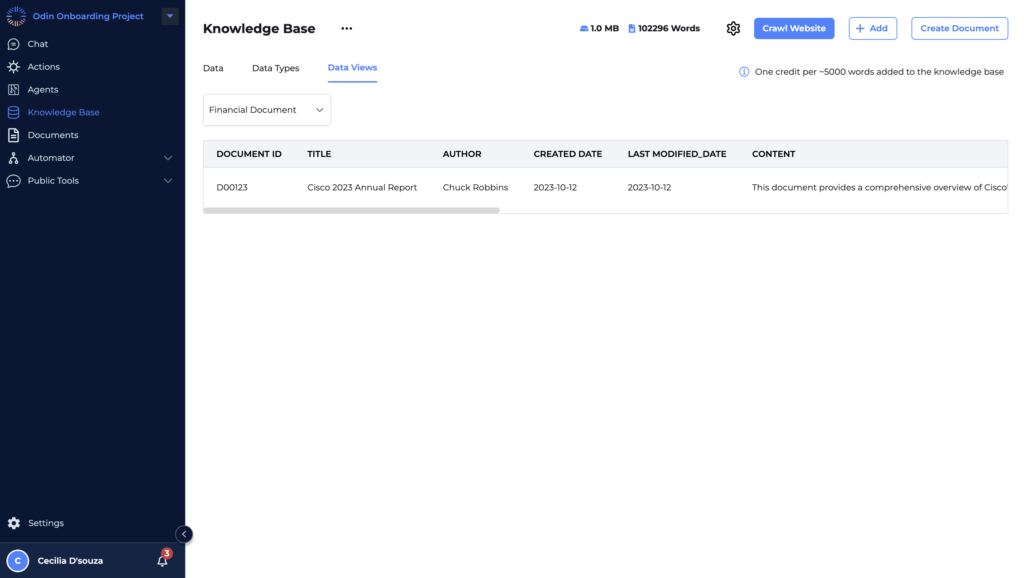
For example, under the “Financial Document” view, you might see:
- Document ID: D00123
- Title: Cisco 2023 Annual Report
- Author: Chuck Robbins
- Created Date: 2023-10-12
- Last Modified Date: 2023-10-12
- Content: A brief summary or specific details extracted from the document.
This organized view allows for quick access and better management of documents, especially when dealing with large datasets or extensive collections of files.
Organize smarter—try Data Types now!
Recommended Reading
Odin AI’s Invoice Validator: Your Path to Error- Free Invoices
Applying a Data Type While Uploading a Document
In addition to applying a Data Type to existing documents in the Knowledge Base, Odin AI allows you to assign a Data Type directly during the document upload process. This streamlines the integration of new resources into your Knowledge Base, ensuring that they are immediately organized and searchable according to your predefined schemas. By doing so, it enhances self-service capabilities, enabling users to independently find answers and solutions and answer their questions without relying on customer support.
Step-by-Step Guide: Applying a Data Type During Upload
Initiate the Upload Process
Click on the “Add” button within the knowledge base interface to begin uploading a new document. This action opens the “Add Resources” window.
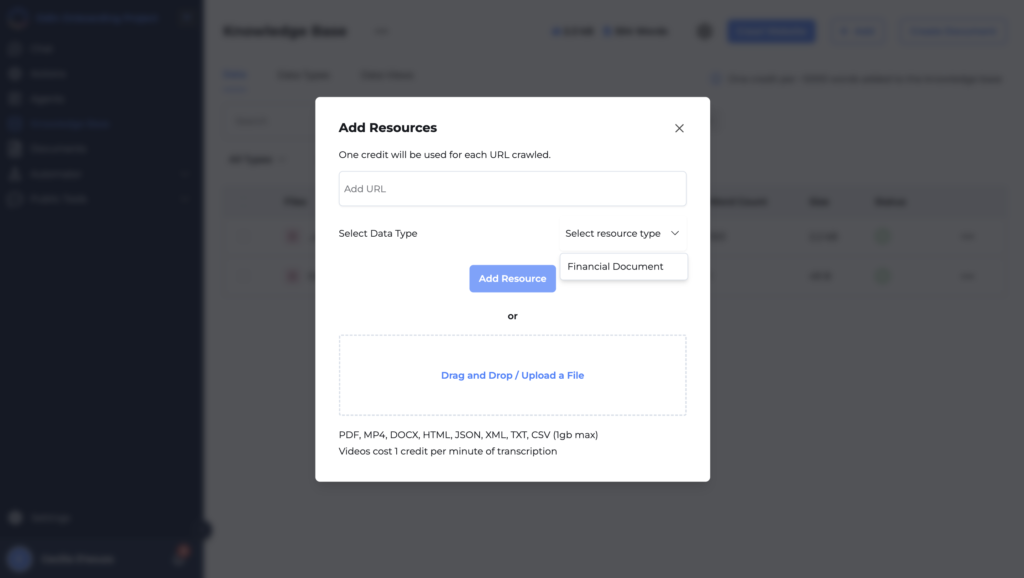
2. Select or Drag and Drop Your File
- In the “Add Resources” window, you can either drag and drop your file (e.g., PDF, DOCX, CSV) into the designated area or manually upload the file by selecting it from your computer.
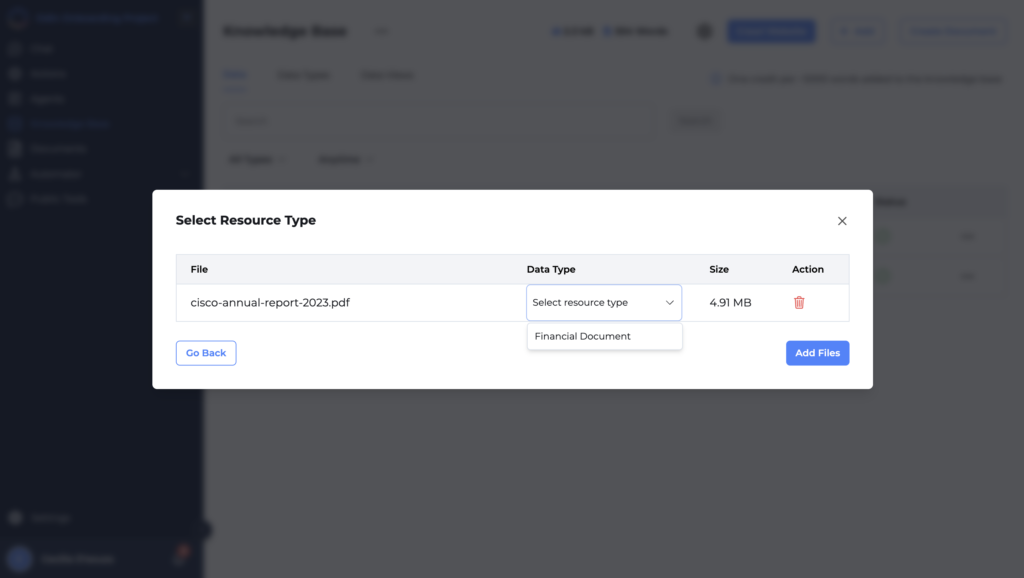
3. Assign a Data Type
- After selecting the file, you’ll see an option to choose a “Data Type.” This is a crucial step where you can immediately categorize the document according to its content. For instance, if you are uploading a financial report, you can select “Financial Document” as the Data Type.
- The Data Type field ensures that the document is organized according to the schema associated with that type, making it easier to manage and search within the Knowledge Base.
- After selecting the file, you’ll see an option to choose a “Data Type.” This is a crucial step where you can immediately categorize the document according to its content. For instance, if you are uploading a financial report, you can select “Financial Document” as the Data Type.
4. Complete the Upload
- Click the “Add Files” button to upload the document. The system will store it according to the schema defined by the chosen data type, making it ready for efficient search and retrieval.
This process ensures that the new document is immediately integrated into the Knowledge Base in a structured and organized manner, making it ready for efficient search and retrieval.
Structure your data with Odin AI!
Recommended Reading
Artificial Intelligence Governance Simplified: A Look at On Premise Deployment
Give Odin A Try
Organizations today are drowning in data, overwhelmed by the constant influx of information that needs to be managed, organized, and retrieved. The frustration of sifting through chaotic systems, the inefficiency of outdated methods, and the missed opportunities from not having the right information at the right time—these are struggles that countless teams face daily.
Odin AI understands these pain points deeply and offers more than just a solution; it provides a way to reclaim your time, to bring order to the chaos, and to empower your teams with the tools they need to thrive. With Odin AI’s advanced knowledge base features, like the Data Type framework, you’re not just organizing data—you’re transforming it into a powerful resource that drives efficiency, accuracy, and success.
Because at the heart of every great organization is the knowledge it holds, and Odin AI is here to help you unlock that potential. Imagine a world where every piece of information is right where you need it, when you need it—because that’s the world Odin AI is helping you create.
Your knowledge is your power—let Odin AI help you wield it.
Have more questions?
Contact our sales team to learn more about how Odin AI can benefit your business.
FAQs
A data type in Odin AI is a structured framework that defines how different pieces of data are organized within the knowledge base. It categorizes information into specific formats, making it easier to manage, search, and retrieve.
Data types are crucial because they ensure that all data in the knowledge base is stored in a consistent and organized manner. This improves searchability, retrieval, and overall knowledge management.
To create a data type in Odin AI, navigate to the "Knowledge Base" section, select the "Data Types" tab, and click the "Create Data Type" button. From there, you can define the schema that structures your data.
A schema is a blueprint that defines the structure, format, and types of data within a document. It helps the Language Model (LLM) in Odin AI to understand and retrieve relevant information more accurately from the knowledge base.
Yes, you can apply a data type to existing documents within your knowledge base. This allows you to organize previously uploaded data using the structured framework of data types.
By organizing data into specific types, data types help the LLM in Odin AI to align search queries with predefined fields, making search results more accurate and targeted.
Yes, Odin AI allows you to assign a data type during the document upload process. This ensures that new documents are immediately categorized and organized within the knowledge base.
Examples of data types include schemas for employee records, product inventories, customer support tickets, and sales transactions. Each schema defines specific fields relevant to the type of data being stored.
Using data types ensures that your knowledge base is well-organized, making it easier for support teams to find the information they need quickly, improving overall productivity and customer satisfaction. This organization also empowers users to resolve their issues independently, thereby reducing the need for contacting customer support.
Odin AI’s Data Type feature is unique in its ability to structure and categorize data in a way that optimizes search and retrieval. It transforms your knowledge base into a powerful resource that enhances knowledge management and drives efficiency.
